My overnight oats happen to be one of my most popular recipes. However, we don’t always need that high amount of carbs in the morning. I set out to create something similar with a lower carb content. I realized there are lots of savory lower carb breakfast dishes out there, but not as many sweet ones.

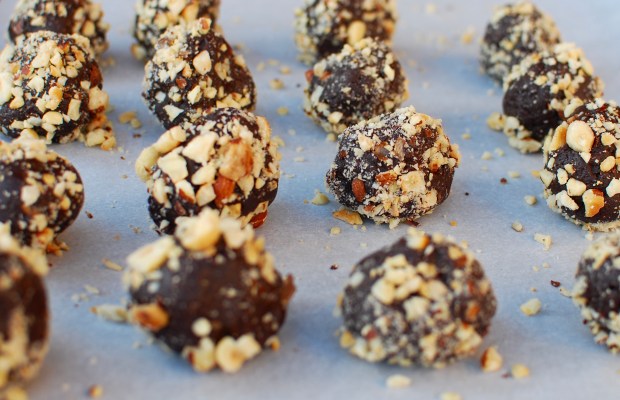
Vanilla Almond Blueberry Overnight Chia seed pudding with a dollop of cashew cream
Now do not get me wrong, carbs are not bad. I am not low carb, anti carb or anything of the like. (I actually love carbs, but that is another article for another time) Sometimes, however, we do need some lower carb choices. (FYI these are not LOW CARB recipes, just LOWER carb)
Here is an example of a handful of times when I might encourage lower carb meals:
- During carb cycling. Carb cycling is when someone consumes a higher amount of carbs 2-3 days a week and a lower amount of carbs on the remaining days. (I personally carb cycle, and need a lower carb option for my low carb days.)
- When stacking carbs around workouts: For many people consuming their vast amount of carbs either before or after their workouts is helpful from both a performance and aesthetic perspective.
- Ladies in menopause/perimenopause. Sorry ladies, but as we enter menopause we can no longer tolerate the same amount of carbohydrates due to dropping estrogen and its effects on insulin.
- Carb back loading, that is when someone saves the majority of their carbs for later in the day.The belief by consuming in the evening hours you are more likely to store the carbohydrates as glycogen instead of fat. (This premise also requires evening workouts)
- When people who have a lower threshold for carbs. We all have our own individual amount of carbs that we do best with. (The trick is figuring out your own threshold. You really need to find the highest amount you can eat, without gaining fat mass)
The basis for these recipes is chia seeds. If you are not familiar with chia seeds, do you remember chia pets? Yep those hair like sprouts were growing from chia seeds. When chia seeds are mixed with a liquid they form a gel like substance, which is what gives these puddings their pudding like consistency. Chia seeds are very high in fiber, contain a decent amount of calcium and magnesium and provide some omega-3 ALA. Due to their very high fiber content, they can help to keep you feeling full and stratified for a long period time, which is part of what makes them great for breakfast.

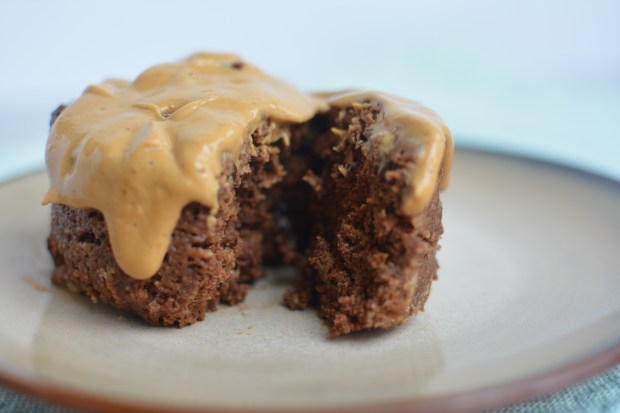
Chocolate Peanut butter Overnight Chia Seed Pudding
Since I needed different options for different people I came up with these sweet chia seed puddings. These bad boys work much like my overnight oats. Put everything in a small mason jar, stir really good, and let it sit overnight (up to 5 days). Save the toppings (especially the fruit) to throw on top right before you eat them. I experimented with some cashew cream for the first time and it goes really (REALLY) well with some of the flavors, especially the vanilla-almond-blueberry.
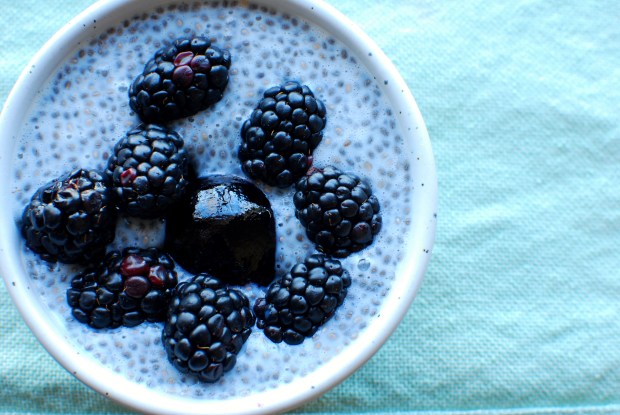
Blackberry Overnight Chia Seed Pudding
I made these puddings with Fairlife* milk to help keep the protein content up, but they still need a little more protein with them if they are to be consumed with breakfast. You can add a side of egg whites, lean breakfast sausage, Canadian bacon, ½ a protein shake or whatever your little heart desires (just keep it lean).
*Fairlife milk is un ultra-filtered dairy milk. It contains 6 grams carbs 13 grams protein, instead of the 12 grams carbs and 8 grams protein found in standard skim dairy milk. You can replace this with any milk of your choice, just note it will change the macros. I highly recommend choosing something high in protein, like a ½ scoop protein powder
It almost feels wrong eating these for breakfast, since they are so decadent. If you are not a sweets for breakfast kind of person these also make a great mid-day snack or before bed sweet (yes you can eat before bed, and many actually would benefit from eating before bed).
Go ahead and make these delicious treats and let me know what you think.

Chocolate-Matcha Raspberry Overnight Chia seed Pudding
Chocolate-Matcha Raspberry
2 Tb Chia seeds
½ cup nonfat Fairlife milk
1 tsp maple syrup
1 Tb cacao or unsweetened dark cocoa powder
¼ tsp vanilla extract
1/8 tsp cinnamon
1 tsp matcha
toppers:
raspberries
Place all ingredients, except for the toppers, in a mason jar and stir very well. Making sure to incorporate all the chia seeds. Place top on it, and store in fridge overnight and up to 5 days. When planning to eat, give a good stir and add any desired toppers.
1 serving contains: 231 calories, 10 g fat, 26 g carbs, and 12 g protein
Blackberry

Blackberry Overnight Chia Seed Pudding
2 Tb Chia seeds
½ cup nonfat Fairlife milk
1 tsp honey
¼ tsp vanilla extract
toppers:
1 Tb no sugar blackberry jam (like Simply Fruits)
blackberries
Place all ingredients, except for the toppers, in a mason jar and stir very well. Making sure to incorporate all the chia seeds. Place top on it, and store in fridge overnight and up to 5 days. When planning to eat, give a good stir and add any desired toppers.
1 serving contains 240 calories, 8 g fat, 30 g carbs, 11 g protein
Vanilla-Almond-Blueberry

Vanilla Almond Blueberry Overnight Chia seed pudding with a dollop of cashew cream
2 Tb Chia seeds
½ cup nonfat Fairlife milk
1 tsp maple syrup
¼ tsp vanilla extract
toppers:
chopped almonds
dollop of cashew cream (see recipe below)
blueberries
Place all ingredients, except for the toppers, in a mason jar and stir very well. Making sure to incorporate all the chia seeds. Place top on it, and store in fridge overnight and up to 5 days. When planning to eat, give a good stir and add any desired toppers.
1 serving contains 286 calories, 15 g fat 25 g carb and 14 g protein
Chocolate Peanut Butter

Chocolate Peanut butter Overnight Chia Seed Pudding
2 Tb Chia seeds
½ cup nonfat Fairlife milk
1 tsp maple syrup
1 Tb cacao or unsweetened dark cocoa powder
¼ tsp vanilla extract
toppers
2 tb PB2 (or another defatted powdered peanut protein) mixed with 1 tb water
cacao nibs
Place all ingredients, except for the toppers, in a mason jar and stir very well. Making sure to incorporate all the chia seeds. Place top on it, and store in fridge overnight and up to 5 days. When planning to eat, give a good stir and add any desired toppers.
1 serving contains 264 calories, 24 g of carbs, 12 g fat, and 16 g protein
Cashew cream
1 cup raw unsalted cashews
½ cup water
1 tb maple syrup (or honey)
vanilla
Cover cashews in boiling water for 15 minutes. Drain and rinse. Place in blender with remaining ingredients and blend till smooth and creamy. Store in fridge for up to 1 week.
1 serving is 1 Tablespoon and contains 53 calories, 4 g fat, 4 g carbs and 2 g protein