Can cookies be healthy? { Recipe for vegan, gluten-free​ chocolate chip cookies)

Can cookies be Healthy?


fullsizeoutput_1e9f

Gluten free, vegan chocolate chip protein cookies


I am a big fan of moderation.  If you want the cookie, well then eat the cookie.  But what if you want a cookie every single day? If that is the case then it might be helpful to have a healthier alternative.

Something that:

  • Can help take the edge off a craving.
  • Something bite-sized.
  • With a little healthy fat.
  • And a little punch of protein.

These tasty morsels fit the bill.


fullsizeoutput_1e9e

Double chocolate protein cookies


Keep in mind, these cookies are tiny. That is by design.  The goal was something to help take the edge off those cookie cravings.  Not a full-on indulgence.  Got make the real thing for that.

The only knock on these tender morsels, is they do not keep. I do not advise doubling the recipe and making a big batch. Since they are made with protein powder they tend to dry out after about 24 hours.

These babies are tender and cake-like straight out of the oven.

Now I made these in the food processor, but you do not have to.  A hand mixer will work just fine.  And if you want to skip your arm workout this week, you can probably stir by hand even.

However, have you ever baked with a four-year-old? If so, then you know the drama of when they can’t keep the hand mixer deep enough in the bowl and you find yourself scraping the dough off the ceiling.  (true story!) The food processor contains the mess for you! (So if you happen to be cooking with kids, give it a try.  It helps with clean up! And they love pressing the button. )

So, can cookies they be healthy?  Well… let’s just go for healthier.  If the cookies never even make it into the oven and you eat the whole bowl of dough while standing in your kitchen, well then no.  You would have been better off eating ONE the real thing.

But just one tidbit has only 83 calories with 4 grams of protein.  If you just need a little something then these guys are for you!

Alright, enough chatter lets get to it.


Healthier Vegan, Gluten Free Mini chocolate chip cookies


¼ cup almond flour

2 Tb Brown Rice Flour

2 Tb coconut oil, melted

2 Tb honey

2 tsp natural peanut butter

1/2 cup Garden of Life Vegan Vanilla protein powder

1 tsp baking soda

¼ unsweetened cashew milk (or milk of choice)

2 Tb mini chocolate chips (I used Enjoy life Vegan chips)


  • Preheat oven to 350.
  • Line baking sheet with parchment
  • Add all ingredients Except the chocolate chips to the bowl of the processor.
  • Mix until thoroughly mixed.
  • Fold in mini chocolate chips (I imagine pecans or walnuts would be great too!),
  • Scoop out one heaping tablespoon and roll into a ball. The dough will not be normal cookie dough. You will have to form it into a ball.
  • Then gently press into the middle to make a cookie like shape.
  • Bake for 6-8 minutes until the edges are just set. They won’t look done.
  • Move to a cooling rack to cool.
  • Enjoy!

**to make the double chocolate ones add 2 Tb Cacao powder.  You may need a splash of more milk.

Makes 12 bite-sized cookies.

Each cookie has 83 calories 5 grams fat, 7 grams carbs, 4 grams protein

gluten free, vegan


How to Have a Healthier and Happier New Year.

Have a healthier and happier 2018 by reshaping your body attitude

One-third of people make new year’s resolution to change their body, and approximately 80% of them will fail. Most of these resolution makers claim that what they want to be happy and healthier in the new year.

However, hating on yourself will not make you happier or healthier, and it isn’t going to encourage your resolution to succeed in the long term.

Research shows what makes people happier and healthier is body acceptance, not body hatred.[1]  So, instead of centering your resolution around negative thoughts of your body, work on approval.

A better resolution: lose the critical thoughts about your body.

Feeling bad about your body will not encourage you to get healthy/lose those 10 lb./start exercising.

How do you know if your resolution is body negative?

  • It makes you feel ashamed of your body or how you look.
  • It paints yourself in a negative light.
  • If you wouldn’t recommend the resolution to a friend.
  • The resolution includes denying yourself of things or punishment.

Where to start with body acceptance: Body neutral statements

For example: If you’ve hated on your thighs for your whole life it is not feasible to all the sudden be able to stand in front of the mirror and exclaim your love for them. Your brain is smarter than that. So, start where you are. If you cannot find something positive to say, say something neutral. Like

“These are my legs.”
“My legs are strong.”

And if you just aren’t there yet with a body part, find a body part you don’t hate.

“My skin is smooth.”
“I like the shape of my shoulders.”

Or even announce what your body has accomplished.

“This belly grew another human being.”
“My legs carry and support me.”
“These arms hold my children and show them love.”

Focus on the positive rather than singling out the negative.

The benefits of this will go far beyond positive body image. Body acceptance can help improved mood, self-esteem, and reduced disorder eating behaviors. When you feel good about yourself, you are happier, and take better care of yourself.

If you want to experience more happiness in the new year, start with ditching the body-hating resolutions. Instead, adopt a more body positive attitude. And if that feels too tricky start with some body-neutral statements.


[1] Florida State University. (2017, December 21). Resolving to have a happier, healthier 2018? Reshape your body attitudes. ScienceDaily. Retrieved December 31, 2017

Easy Egg White Frittata. {Low Carb, Low Fat, High Protein}

Easy like Sunday morning low carb low-fat frittata

DSC_0345

Before we get going, I have to get something out of the way.

Carbs are not bad.

Fats are not bad either.

There are no bad foods.

(Go ahead and reread those. I’ll wait. It’s important)

Now, this recipe is low in both carbs and fat not because you should avoid them but so it customizable for any meal plan.

Need more carbs with your breakfast? Pair with a side of fruit or sprouted grain toast.

Need more fat with your brekkie?  Then have some avocado with it. Or even a slice of bacon.

Now that we got that out of the way let’s get to it.

DSC_0355

Easy like a Sunday Morning Frittata
  • 3 oz, Canadian Bacon, diced
  • 25 cup, shredded cheddar cheese (use fat-free or low fat if YOU want to keep the dish lower in fat)
  • 4 oz, Tomatoes chopped ( I like to use cherry)
  • 2 Cup Zucchini grated
  • 24 ounces, Egg White (if you wish to add whole eggs, remove 2 oz of whites for every whole egg)
  • ¼ cup fresh basil, torn


Preheat oven to 350.

  1. Grate the zucchini. I like to use the grater attachment on the food processor, but a box grater will also work.  Once grated place in a strainer and toss with 1 tsp kosher salt.  Set aside while prepping the rest of the ingredients.
  2. Using a paper towel run the inside of cast iron skillet with olive oil.
  3. Heat pan over medium-high heat. When hot add diced Canadian Bacon.
  4. Meanwhile, beat the egg whites.
  5. Using a paper towel or a tea towel, squeeze out all the excess water from the grated zucchini.
  6. Add tomatoes and zucchini to skillet.
  7. Allow veggies to cook for about 3 mins.
  8. Pour whites in the skillet.
  9. Sprinkle cheese over the top
  10. Place in the oven and bake for about 30 minutes. It is down when the middle is fully set.
  11. Remove from oven, let cool for at least 5 min and top with torn basil.
  12. Eat and enjoy!

Nutrition info for ¼ the skillet: 145 calories  gram fat, 4 grams carbs and 26 grams protein

Low Carb and Low fat

Quick and Easy Turkey Tenderloin

Are you burnt out on the same old boneless skinless chicken breast? How about trying out some turkey?

Hold up! Before you leave, I’m not talking about the tasteless, bland ground turkey or the dried out bird from the holidays. I’m talking about turkey tenderloins.

Roasted Turkey Tenderloin

Quick and Easy Turkey Tenderloin

Wait, what? The turkey has a tenderloin?!

The tenderloin is the thick cut of meat from between the breasts. Since that muscle doesn’t get much use, it is more tender than the rest of the bird.  I find it is similar to chicken in texture, but with more flavor.  And just like chicken, it is highly versatile! Pretty much any recipe that you would use chicken in you can sub with turkey tenderloin. Grill, roast, stir fry, breaded, pan fried, stuffed, you get the idea.

The tenderloin is a quick cooking very lean cut of meat.  It has 8% more protein than chicken breast and depending on how you prep it, it can be ready to eat in just a few minutes.  3 ounces of cooked turkey tenderloin has only 120 calories, 1 gram of fat and 26 grams of protein.

The biggest (only?) knock on turkey tenderloin is, just like the whole bird, it does dry out if overcooked. So make sure you use a thermometer.  You’ll want to cook it till it reads 160, then let it rest for 10 minutes (to finish cooking).

Below is my favorite super quick and easy way to make it. Be prepared to see more recipes incorporating turkey tenderloin in the coming months.  I’m envisioning maybe an Asian inspired stir fry and a fall-ish dish with roasted squash, Brussel sprouts, and pomegranates?

Quick and easy Turkey Tenderloin

2 Lbs. Turkey tenderloin

3 Tb Soy sauce (use Tamari if gluten Free)

1 Tb Dijon Mustard

2 tsp Poultry seasoning (or rosemary, sage and thyme)

1/2 tsp Garlic powder

1 tsp Salt

  1. Preheat broiler to high, and move rack to 4 inches below heat.
  2. Remove turkey from packaging and blot dry with paper towels. Place on a cooking sheet lined with foil.
  3. Season meat liberally with salt and garlic powder.
  4. In a small bowl mix soy sauce, Dijon mustard and herbs.
  5. Pour half sauce over the turkey. Flip turkey and pour on the rest.
  6. Insert thermometer in middle of the tenderloin.
  7. Place in oven and broil for approximately 20 minutes, flipping half way through cooking
  8. Remove turkey from oven when it reaches 160 and move to cutting board and let rest for 10 mins.

how to

Step away from the diet.

Too many people are on a perpetual diet.  Constantly being a slave to a reduced intake.

The problem is you cannot always be on a diet. Diets are not meant to be a long term thing and they stop working if you are on them too long.

News flash: your body does not give two poops about your physique goal. It actually does not want you to be lean.  The body wants homeostasis, and it will do just about anything to maintain that.

According to Dictionary.com: homeostasis is the tendency of the body to seek and maintain a condition of balance or equilibrium within its internal environment, even when faced with external changes.

Also known as why the eff does our body make this so freaking hard!?

The good news is there is an easy thing you can do. You can trick the body into not maintaining homeostasis and take a break from dieting at the same time. This wonderful thing is called maintenance mode.

In order to maintain homeostasis our bodies will start to compensate for the reduced caloric intake.
Untitled design-4

Mmmm, berries. 

It’s not so neat.

One way this happens the body naturally decreases its NEAT (non exercise activity thermogenesis).  NEAT is the energy expended for everything we do that is not sleeping, eating or planned exercise. It is the mindless fidgeting, toe tapping, walking and playing that we do day to day. It is not planned movement, but the activity we unconsciously or spontaneously decide to do.

When we decrease the energy we put in our bodies, our bodies will decrease the energy it expends (In other words: eat LESS burn LESS). There will be less walking, less unplanned movement.  Even something as simple as tapping your foot or twitching your fingers while working can be decreased.  These movements don’t seem like much, but they add up. NEAT can account for 15-50% of your daily caloric burn. (That could be roughly anywhere from 200-900 calories!)

Increased Perceived Exertion

While on a diet, especially long term, eventually our workouts can suffer.  You will no longer be burning the same amount of calories as you previously were even though the workout may feel harder.  When we are in a caloric deficit or super low carb for a period of time we tend to have a higher perceived rate of exertion (how hard a workout feels). We think we are kicking butt in the gym when in actuality we’re not. Caloric deficits (and extreme low carbing it) can also enhance fatigability which make us feel tired and we think the workouts feel harder than it really is.

I’m hungry.

When in a deficit appetite will go up, this is true especially for women. Leptin is the hormone responsible for our hunger signals.  As our body fat decreases, our leptin increases.  Increased leptin means we feel hungrier.  (Remember our body wants us back at the previous weight, and it is telling you to eat to get back there.)

What often happens when the appetite ramps up, we eat. Sometimes we are not even aware we are consuming more food. Cravings can become more intense, and those occasional indulges become less occasional.

When our appetite is high we tend to indulge in more licks, bites and nibbles.  Like licking the peanut butter off the knife. Having a bite of the kids’ dessert. Nibbling on some leftovers while pondering what to make for dinner. Individually those things don’t seem like much (and there not) but repeatitively they add up! And when leptin is high the tendency is to have more licks, bites and nibbles, sometimes without even being aware of them.

How your body reacts will be unique to you, but here are some signs you’ve been on a diet too long and it’s time to back away:

  • You’ve been in a caloric deficit for 12 week (or longer).
  • Your progress has stalled.
  • There has been a loss of strength.
  • You’ve started showing signs of hormone disruptions. (blood sugar swings, having trouble falling asleep or staying asleep, you are retaining more water.)
  • Ladies your menses may have changed.
  • Loss of libido.
  • Loss of appetite OR feeling like you are absolutely ravenously starving and unable to feel full.
  • Cravings are through the roof, and they may be uncontrollable at times.
  • Binge eating
  • Mental fog, grumpiness
  • Physique is starting to look flat and deflated or puffy and swollen.

So, what do you do now? Back away from the diet!

SERIOUSLY TAKE A BREAK.

Maintenance is where the magic happens.

You need to return to maintenance mode. Maintenance is the amount of food you need to eat to stay at your current body weight.  (Not where you hoped to be. Not what you needed to eat in high school. But what you need to eat with your body as it is today.)

The pros to maintenance mode:

It gives your body a break

It gives your mind a break (which allows the next time your diet to be easier)

Now maintenance mode is NOT a free pass. It is not a time to go crazy.  Absolutely do not think of it as a cheat.  Or as a chance to eat all the things. It is maintenance. (if however, you find you cannot stop binging during maintenance mode, your previous diet may have been too restrictive).

Diet with maintenance

A very fancy and non scientific line graph demonstrating how much better it is to include periods of maintenance in you life.

Two ways to approach this.  Calorie and macro counting or intuitive eating.

Intuitive Eating

The easiest way is to return to a more intuitive way of eating.

The rules are simple:

  1. Eat when hungry, but before you are starving.
  2. Eat protein at every single meal. (Men should aim for 6-8 servings/day and women need 4-6 day)
  3. Stop eating BEFORE you are full.
  4. Load your plate with lots of veggies and fruit. (6-8 servings a day!)
  5. Fill the rest in with healthy carbs and fat.

The trick is you really need to listen to your body.  Especially your hunger and fullness cues.  That is when your body tells you it is hungry, before you get hungry. And it tells you to stop eating BEFORE you feel overly physically full. If you and your body haven’t been on good speaking terms lately then food tracking may be a better choice for you.

Food tracking.

This would be setting a prescribed set amount of calories and macros and logging your daily intake.  This takes more work, but it is best if you don’t have great appetite cues (ie: you don’t know when you are hungry and or when you are almost full)  or you just prefer tracking.

1st: make sure you are consuming enough protein.  If you are consuming less than .8 grams/LB of body weight bring that up first. (Ex. If you are 150 pounds 150x.8=120)

Once you have been eating at least .8g protein/Lb for 2 weeks, then assess your carbs and fat.

Pick one, either carbs or fat to bring up. (If your fat intake is under 35 grams start there otherwise start with carbs.)

You can bring up the fat up by for 10-20 grams or carbs up by 25-50 grams.  Continue to eat that amount for 2 weeks.

Watch your weight, measurements and progress photos.  Objectively watch your body (this is hard and can help to have a second opinion). Using mainly scale weight and progress photos, once you notice you are no longer losing weight and it is holding steady, you are in maintenance mode.

Optimally  you’ll stop increasing your intake right before you start to gain weight back, but if not it is no biggie just back pull back a little. (If you were low carb editing, I don’t recommend just going by scale weight, as an increase in carbs can cause the numbers to creep up BUT it is not fat, just the body replenishing glycogen)

Once you hit maintenance you should try to hang out there for at least 2 weeks.

Both methods can work, you just need to chose the best that works for you.

So, quit trying to white knuckle it through your perpetual diet and take a break! You will find that you will bust through that plateau and then next phase of dieting is even easier to adhere to.


If you would like more personalized help, fill out the contact form and I will get back to in 24 hrs and we can chat about your personal situation.

Low Carb, High Protein Make-ahead Zucchini Fritters.

Need an easy grab and go breakfast when the morning rush got you like whoa? I got you covered with these make ahead low carb high protein zucchini fritters.

DSC_0255

These zucchini fritters make for an easy on the go breakfast option.

These make-ahead zuke fritters are not only great straight out of the pan they are also pretty delicious cold from the fridge the next day. (And the day after that too!)

You can eat them as they are (may I reccomend a sprinkle of salt and dash of hot sauce?) or as a bun for a sausage patty. I personally eat them alone, one handed. Usually while rushing to get my oldest to the bus stop on time.

They can make a nice lunch too. As an accompaniment to a BAS salad or bowl of soup.

My favorite part of them is their volume.  One serving is eight fritters. Yes, EIGHT! They make me feel like I am eating much more than I am, helping to keep my full for hours.  If 8 fritters seems like too much for you, no problem! Just have a half serving.

Alright, let’s get to it:


Low Carb, High protein Zucchini Fritters
  • 2 Tb coconut flour
  • 5 eggs
  • 3 TB egg white
  • ¼ tsp garlic powder
  • ¼ tsp onion
  • ¼ tsp black pepper
  • ½ tsp salt
  • 3 large zucchinis, grated (should be about 4 cups)


  1. After grating the zucchini, using a paper towel squeeze out the excess water. (The drier you can get it the better).
  2. Using a whisk (or fork) beat the eggs, whites, coconut flour, garlic powder, onion powder and salt and pepper.  (The coconut flour will want to clump, just keep whisking).
  3. Heat a large skillet over med high heat and spritz with cooking spray.
  4. Using a ¼ cup OR an ice cream scoop, scoop and put in hot pan. Light press them out, into a 4 in pancake. (my skillet can only hold 4 at a time, so plan to be batch cooking).
  5. Cook for 3-4 mins per side.
  6. When done, set on paper towel to cool. If storing, wait till fully cooled. Blot again with paper towel and store in fridge for 3-4 days.

Makes 16 4 inch fritters.

Nutrition for 8 (YES, that’s right I said EIGHT fritters): Calories: 260 Fat:14g Carbs: 12g Protein: 22g


Inspired by Zucchini Pancakes in Practical Paleo by Diane Sanfilippo.


Zucchinifritters.png

Quick and Easy on the Go Protein

It happens to be back to school time around these parts, and I know (first-hand) how chaotic mornings can be.  So real quick I wanted to share with you one of my meal preps that help me have a healthy breakfast even when we are running late and no one can find their shoes. (Seriously, what is it with the shoes?!)

All you need is a carton of egg whites, silicon muffin tray, spray oil and an oven.  If you are a bulk store shopper (like at Costco or Sam’s) you can buy a case of egg whites and freeze them.  Then each week I just take out what you need.

DSC_0218

Easy peasy and versatile egg whites

These egg white muffins will cook in 15 minutes and will keep in a sealed container in the fridge for 5 is days.

These little unassuming things are incredibly versatile.  They are pretty bland, but that is part of what makes them so versatile.  If you wanted you can easily add fresh veggies or meat and cheese to them.

I personally like to put one or two on an English muffin with a slice of Canadian bacon and eat while sitting in the school carpool lane.  Sometimes I even enjoy them straight from the fridge with a generous sprinkle of salt.

You can also put them in a burrito, add to a sandwich, or smear them with avocado or hummus.


Each patty has only 17 calories with 4 grams of protein.

Easy Peasy Make Ahead Egg White Thingies
  • 1 12 oz carton liquid egg whites
  • Spray oil
  • Silicon muffin tray or silica muffin liners (I don’t recommend
  1. Preheat oven to 350
  2. Spray silicon muffin tray (or regular tray with silicon liners) with spray oil.
  3. Pour equal amounts egg whites into each tray.Cook for 15-18 minutes. They are done with the tops are fully set (I prefer mine to start to get a little crispy around the edges.
  4. Remove from oven and let cool 5-10 minutes.  Once cool blot with paper towel and store in sealed container in t

Cinnamon Bun, 5 Minute, High Protein Mug Cake

Mug Cake Monday again!

Today we have a high protein, 5-minute cinnamon bun mug cake.

China-bun Mug Cake

5 minute, high protein, cinnamon bun mug cake!

Just like last week’s mug cake, this baby can be made in the microwave in just over a minute and they are a great pre workout meal. (If you missed last weeks, we had a double chocolate peanut butter one you can go check out here.)

I am a big advocate for fueling your workout. Optimally, 1-2 hours before your workout you should have a meal that consists of carbs and protein.  In most cases 25-50 grams of carbs, 15-30 grams of protein and less then 10 grams of fat. This mug cake fits the bill.  Plus, it is freaking delicious.

This mug cake has 14 grams of protein, for those who need more pre workout, a scrambled egg white or a glass of skim milk is a perfect accompaniment.

By supplying your body with fuel before your workout, you are more likely to work out harder and in turn get a better workout, than if you were to do it fasted.  Multiple studies have shown there is no great benefit to fasted training. [1][2]

Again, I used Kodiak Cakes power cake mix since it is higher in protein.  You can use any pancakes mix that you want, just know it will alter the nutritional breakdown.  I have even made these with Enjoy Life’s allergy free pancake mix and they came out great.

5 min Cinnamon Bun Mug Cake

Cooking spray

½ cup Kodiak power cake mix

1 tsp coconut sugar (any sweetener of choice will work here)

½ tsp cinnamon

1/8 tsp salt

1 tsp melted coconut oil

¼ cup cashew milk (and dairy like beverage would work)

1/2 tsp vanilla extract

1 tsp coconut sugar

½ tsp cinnamon


  1. Generously spray the insides of a large microwave safe mug with cooking spray.
  2. Mix in pancake mix, 1 tsp sugar, ½ tsp cinnamon, and salt.
  3. In separate microwave safe cup mix milk, oil and vanilla. Heat in microwave till coconut is melted.
  4. Add the liquids with dry ingredients. Gently mix till just combined, making sure in mix in all the dry power off the bottom of the mug but do over stir!
  5. Top with additional cinnamon and sugar and cut in with a knife.
  6. Microwave at 75% power for 90 seconds.
  7. Let stand for 1 min, then enjoy!


Nutrition for one mug cake:  275 calories 41 carbs 8 fat and 14 protein


Works Cited

[1]Paoli A1, M. G. (2011). Exercising fasting or fed to enhance fat loss? Influence of food intake on respiratory ratio and excess postexercise oxygen consumption after a bout of endurance training. Int J Sport Nutr Exerc Metab, 48-54.

[2]Schoenfeld B., A. A. (2014). Body composition changes associated with fasted versus non-fasted aerobic exercise. J Int Soc Sports Nutr, 54.

5 Minute, High protein Cinnamon BunMug Cake


5 Minute Double Chocolate Cake with Peanut Butter Frosting

For the next few Mondays, I will be sharing different high protein mug cake recipes, because sometimes Mondays just need some cake!

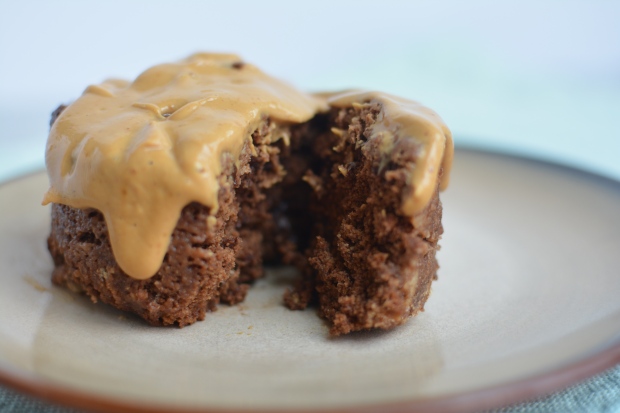
Double chocolate mug cake w/ PB frosting

Chocolate cake in just 5 mins!

Mug cakes are just that, a cake made in a large coffee mug!

To keep the protein high in these I use Kodiak Powercakes Mix, it has 14 grams of protein per serving and can be found at major grocery stores (including Costco, Target and Amazon).

You can use any pancake mix you want (including gluten free.  I have even made these with Enjoy Life’s pancake mix).  Just know different mixes will change the nutrition.

Now for that cake…

5 min Double Chocolate Mug Cake with Peanut Butter Frosting
  • Cooking spray
  • ½ cup Kodiak Cake Power Mix
  • 1 Tb Cocoa powder
  • 2 tsp coconut sugar (any sweetener of choice will work here)
  • 1/8 tsp salt
  • 1/8 tsp cinnamon
  • 1 tsp coconut oil
  • ¼ cup unsweetened cashew milk (can use any unsweetened milk)
  • ¼ tsp vanilla
  • 2 TB mini chocolate chips
  • 2 Tb PB2 (defatted dried peanut butter)
  • 1.5 Tb water


  1. Spray an extra-large microwave safe mug liberally with cooking spray.
  2. In mug, mix Kodiak Cake mix, Cocoa, sugar, salt and cinnamon.
  3. In a separate dish warm the cashew milk and coconut oil in the microwave (the oil should be melted but not boiling)
  4. Add the vanilla to the warm milk. Stir.
  5. Gently pour the liquids into the mug and stir gently. Mix till just combined (Do not over stir, or it will be tough.)
  6. Fold in chocolate chips
  7. Microwave at 75% power for 90 seconds. Let stand in the microwave for 1 min.
  8. While that nukes, mix the PB2 and water. Use as much water as you need to make a frosting like consistency.
  9. Gently side a knife around the edges of the cake and dump it on to a plate
  10. Frost with peanut butter frosting
  11. EAT CAKE!


Nutrition for the whole dang thing:

335 calories, 48 grams carbs, 9 grams fat, 20 grams protein

Slow Cooker Blueberry Crumble, Gluten free and Vegan

Vegan Gluten Free blueberry slow cooker crumble

Or is it a cobbler? Or a crisp? I don’t know. I’m not sure if it’s the that fact that all those words start with the letter c, but I cannot ever keep them straight.

So, I consulted The Kitchn. According to them:

Cobblers generally have biscuit topping dropped on the fruit. Crisps and crumbles are very similar.  They both contain fruit and streusel like topping. They only difference is crisps contain oats and crumbles do not.

That settles it! This is a blueberry crumble then.

A vegan gluten free slow cooker crumble no less!

I recently made this desert for my husband’s birthday. I happened to post in on my insta stories and got tons requests for the recipe.  I decided instead of messaging everyone with the recipe I would just post it here.

Note this is not, low calorie, low fat or low carb. But it is damn delicious! And what is life without some dessert every now then.  We are all about moderation over here.

DSC_0193

Fruit cobblers are perfect way to use up summer’s berries.  I used blueberries in this, but I don’t see why you couldn’t sub out any other berry.  You may need to double check the sweetness, however, if you do.

Now let’s be honest, in the dead of summer do you really want to turn on your oven for an hour? Not me.  So, I recreated this quintessential summer dish using the slow cooker. It took 3 hours on low in mine, but if your tend to run a little cooler it may take longer.

This dish is both vegan and gluten free. And white it does contain nuts, it could easily be adapted to be nut free also.

DSC_0226

This is not an overly sweet dessert.  If you would like it sweeter, add more maple syrup to the berries. Or if you want a sweeter topping, add more sugar.  I have tested it with up to twice the amount of sugar, we just prefer less sweet around here.

Gluten free Vegan Slow Cooker Blueberry Crumble

Cooking spray (I prefer coconut oil spray)

2 pints blueberries

2 Tb arrowroot powder

4 Tb maple syrup, divided

1 tsp lemon zest

1 tb lemon juice, freshly squeezed

1/8 tsp cinnamon

1 1/3 cups Oats, old fashioned or rolled (not quick oats)

½ cup Almond flour (could sub out gluten free flour if avoiding nuts, but I didn’t try it.)

1/2 cup Sugar (both cane sugar or coconut sugar will work)

¼ cup chopped pecans

1/2 tsp salt

6 Tb COLD coconut oil (if it warm where you are, throw in the freezer for 5 mins till it firms up)


  1. Spray the inside of a slow cooker with cooking spray.
  2. Dump in 2 pints of blue berries.  Try not to eat them all.
  3. Toss the berries with the arrowroot powder, lemon zest, lemon juice and 3 Tb of the maple syrup.
  4. In a separate bowl make the crumble topping. (the best part IMHO)
  5. Mix oats, almond flour, sugar, pecans and salt.
  6. Using your hands, mix in coconut oil till crumbled. Taste test and adjust sweetness if needed, but try not to eat it all. Seriously try hard.
  7. Sprinkle the crumble on top of blueberries and drizzle the remaining 1 Tb of maple syrup on top.
  8. Cook on low for 3 hours.
  9. After 3 hours, turn of the slow cooker and let it sit for 15 mins.

Serve with a scoop of dairy free whipped topping or vanilla ice cream.


Nutrition for 1/8th the recipe (not including the whipped topping/ice cream):


343 calories. 18 grams fat. 46 grams carbs. 5 grams protein

recipe is adapted from Minimalist Bakers Grain-Free Berry Crisp

Slow cooker, gluten free, vegan