Easy Egg White Frittata. {Low Carb, Low Fat, High Protein}

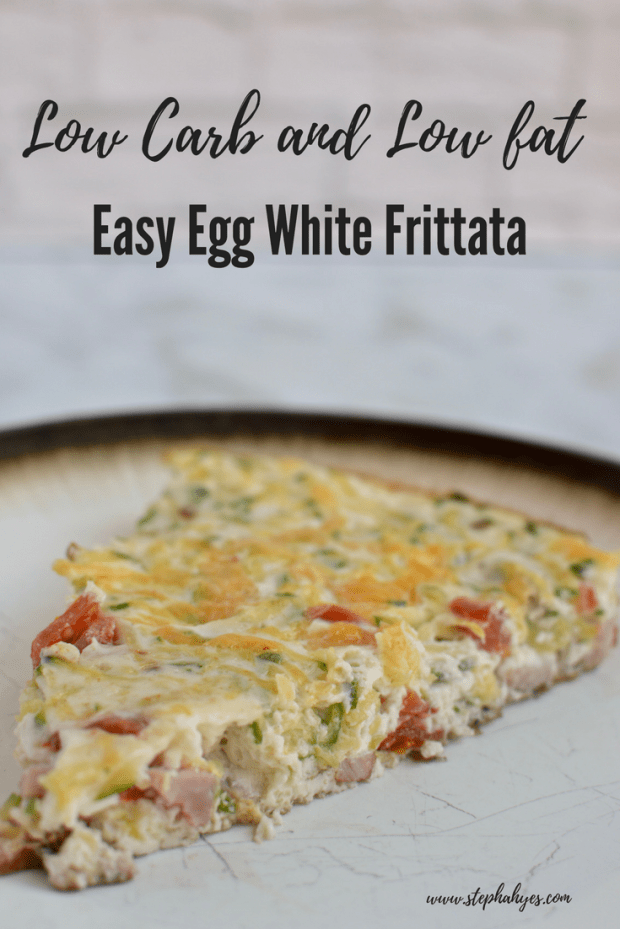
Easy like Sunday morning low carb low-fat frittata

DSC_0345

Before we get going, I have to get something out of the way.

Carbs are not bad.

Fats are not bad either.

There are no bad foods.

(Go ahead and reread those. I’ll wait. It’s important)

Now, this recipe is low in both carbs and fat not because you should avoid them but so it customizable for any meal plan.

Need more carbs with your breakfast? Pair with a side of fruit or sprouted grain toast.

Need more fat with your brekkie?  Then have some avocado with it. Or even a slice of bacon.

Now that we got that out of the way let’s get to it.

DSC_0355

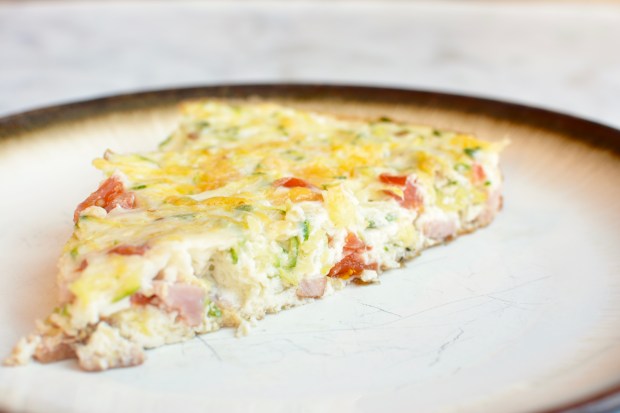
Easy like a Sunday Morning Frittata
  • 3 oz, Canadian Bacon, diced
  • 25 cup, shredded cheddar cheese (use fat-free or low fat if YOU want to keep the dish lower in fat)
  • 4 oz, Tomatoes chopped ( I like to use cherry)
  • 2 Cup Zucchini grated
  • 24 ounces, Egg White (if you wish to add whole eggs, remove 2 oz of whites for every whole egg)
  • ¼ cup fresh basil, torn


Preheat oven to 350.

  1. Grate the zucchini. I like to use the grater attachment on the food processor, but a box grater will also work.  Once grated place in a strainer and toss with 1 tsp kosher salt.  Set aside while prepping the rest of the ingredients.
  2. Using a paper towel run the inside of cast iron skillet with olive oil.
  3. Heat pan over medium-high heat. When hot add diced Canadian Bacon.
  4. Meanwhile, beat the egg whites.
  5. Using a paper towel or a tea towel, squeeze out all the excess water from the grated zucchini.
  6. Add tomatoes and zucchini to skillet.
  7. Allow veggies to cook for about 3 mins.
  8. Pour whites in the skillet.
  9. Sprinkle cheese over the top
  10. Place in the oven and bake for about 30 minutes. It is down when the middle is fully set.
  11. Remove from oven, let cool for at least 5 min and top with torn basil.
  12. Eat and enjoy!

Nutrition info for ¼ the skillet: 145 calories  gram fat, 4 grams carbs and 26 grams protein

Low Carb and Low fat

Quick and Easy Turkey Tenderloin

Are you burnt out on the same old boneless skinless chicken breast? How about trying out some turkey?

Hold up! Before you leave, I’m not talking about the tasteless, bland ground turkey or the dried out bird from the holidays. I’m talking about turkey tenderloins.

Roasted Turkey Tenderloin

Quick and Easy Turkey Tenderloin

Wait, what? The turkey has a tenderloin?!

The tenderloin is the thick cut of meat from between the breasts. Since that muscle doesn’t get much use, it is more tender than the rest of the bird.  I find it is similar to chicken in texture, but with more flavor.  And just like chicken, it is highly versatile! Pretty much any recipe that you would use chicken in you can sub with turkey tenderloin. Grill, roast, stir fry, breaded, pan fried, stuffed, you get the idea.

The tenderloin is a quick cooking very lean cut of meat.  It has 8% more protein than chicken breast and depending on how you prep it, it can be ready to eat in just a few minutes.  3 ounces of cooked turkey tenderloin has only 120 calories, 1 gram of fat and 26 grams of protein.

The biggest (only?) knock on turkey tenderloin is, just like the whole bird, it does dry out if overcooked. So make sure you use a thermometer.  You’ll want to cook it till it reads 160, then let it rest for 10 minutes (to finish cooking).

Below is my favorite super quick and easy way to make it. Be prepared to see more recipes incorporating turkey tenderloin in the coming months.  I’m envisioning maybe an Asian inspired stir fry and a fall-ish dish with roasted squash, Brussel sprouts, and pomegranates?

Quick and easy Turkey Tenderloin

2 Lbs. Turkey tenderloin

3 Tb Soy sauce (use Tamari if gluten Free)

1 Tb Dijon Mustard

2 tsp Poultry seasoning (or rosemary, sage and thyme)

1/2 tsp Garlic powder

1 tsp Salt

  1. Preheat broiler to high, and move rack to 4 inches below heat.
  2. Remove turkey from packaging and blot dry with paper towels. Place on a cooking sheet lined with foil.
  3. Season meat liberally with salt and garlic powder.
  4. In a small bowl mix soy sauce, Dijon mustard and herbs.
  5. Pour half sauce over the turkey. Flip turkey and pour on the rest.
  6. Insert thermometer in middle of the tenderloin.
  7. Place in oven and broil for approximately 20 minutes, flipping half way through cooking
  8. Remove turkey from oven when it reaches 160 and move to cutting board and let rest for 10 mins.

how to

Low Carb, High Protein Make-ahead Zucchini Fritters.

Need an easy grab and go breakfast when the morning rush got you like whoa? I got you covered with these make ahead low carb high protein zucchini fritters.

DSC_0255

These zucchini fritters make for an easy on the go breakfast option.

These make-ahead zuke fritters are not only great straight out of the pan they are also pretty delicious cold from the fridge the next day. (And the day after that too!)

You can eat them as they are (may I reccomend a sprinkle of salt and dash of hot sauce?) or as a bun for a sausage patty. I personally eat them alone, one handed. Usually while rushing to get my oldest to the bus stop on time.

They can make a nice lunch too. As an accompaniment to a BAS salad or bowl of soup.

My favorite part of them is their volume.  One serving is eight fritters. Yes, EIGHT! They make me feel like I am eating much more than I am, helping to keep my full for hours.  If 8 fritters seems like too much for you, no problem! Just have a half serving.

Alright, let’s get to it:


Low Carb, High protein Zucchini Fritters
  • 2 Tb coconut flour
  • 5 eggs
  • 3 TB egg white
  • ¼ tsp garlic powder
  • ¼ tsp onion
  • ¼ tsp black pepper
  • ½ tsp salt
  • 3 large zucchinis, grated (should be about 4 cups)


  1. After grating the zucchini, using a paper towel squeeze out the excess water. (The drier you can get it the better).
  2. Using a whisk (or fork) beat the eggs, whites, coconut flour, garlic powder, onion powder and salt and pepper.  (The coconut flour will want to clump, just keep whisking).
  3. Heat a large skillet over med high heat and spritz with cooking spray.
  4. Using a ¼ cup OR an ice cream scoop, scoop and put in hot pan. Light press them out, into a 4 in pancake. (my skillet can only hold 4 at a time, so plan to be batch cooking).
  5. Cook for 3-4 mins per side.
  6. When done, set on paper towel to cool. If storing, wait till fully cooled. Blot again with paper towel and store in fridge for 3-4 days.

Makes 16 4 inch fritters.

Nutrition for 8 (YES, that’s right I said EIGHT fritters): Calories: 260 Fat:14g Carbs: 12g Protein: 22g


Inspired by Zucchini Pancakes in Practical Paleo by Diane Sanfilippo.


Zucchinifritters.png

Cinnamon Bun, 5 Minute, High Protein Mug Cake

Mug Cake Monday again!

Today we have a high protein, 5-minute cinnamon bun mug cake.

China-bun Mug Cake

5 minute, high protein, cinnamon bun mug cake!

Just like last week’s mug cake, this baby can be made in the microwave in just over a minute and they are a great pre workout meal. (If you missed last weeks, we had a double chocolate peanut butter one you can go check out here.)

I am a big advocate for fueling your workout. Optimally, 1-2 hours before your workout you should have a meal that consists of carbs and protein.  In most cases 25-50 grams of carbs, 15-30 grams of protein and less then 10 grams of fat. This mug cake fits the bill.  Plus, it is freaking delicious.

This mug cake has 14 grams of protein, for those who need more pre workout, a scrambled egg white or a glass of skim milk is a perfect accompaniment.

By supplying your body with fuel before your workout, you are more likely to work out harder and in turn get a better workout, than if you were to do it fasted.  Multiple studies have shown there is no great benefit to fasted training. [1][2]

Again, I used Kodiak Cakes power cake mix since it is higher in protein.  You can use any pancakes mix that you want, just know it will alter the nutritional breakdown.  I have even made these with Enjoy Life’s allergy free pancake mix and they came out great.

5 min Cinnamon Bun Mug Cake

Cooking spray

½ cup Kodiak power cake mix

1 tsp coconut sugar (any sweetener of choice will work here)

½ tsp cinnamon

1/8 tsp salt

1 tsp melted coconut oil

¼ cup cashew milk (and dairy like beverage would work)

1/2 tsp vanilla extract

1 tsp coconut sugar

½ tsp cinnamon


  1. Generously spray the insides of a large microwave safe mug with cooking spray.
  2. Mix in pancake mix, 1 tsp sugar, ½ tsp cinnamon, and salt.
  3. In separate microwave safe cup mix milk, oil and vanilla. Heat in microwave till coconut is melted.
  4. Add the liquids with dry ingredients. Gently mix till just combined, making sure in mix in all the dry power off the bottom of the mug but do over stir!
  5. Top with additional cinnamon and sugar and cut in with a knife.
  6. Microwave at 75% power for 90 seconds.
  7. Let stand for 1 min, then enjoy!


Nutrition for one mug cake:  275 calories 41 carbs 8 fat and 14 protein


Works Cited

[1]Paoli A1, M. G. (2011). Exercising fasting or fed to enhance fat loss? Influence of food intake on respiratory ratio and excess postexercise oxygen consumption after a bout of endurance training. Int J Sport Nutr Exerc Metab, 48-54.

[2]Schoenfeld B., A. A. (2014). Body composition changes associated with fasted versus non-fasted aerobic exercise. J Int Soc Sports Nutr, 54.

5 Minute, High protein Cinnamon BunMug Cake


5 Minute Double Chocolate Cake with Peanut Butter Frosting

For the next few Mondays, I will be sharing different high protein mug cake recipes, because sometimes Mondays just need some cake!

Double chocolate mug cake w/ PB frosting

Chocolate cake in just 5 mins!

Mug cakes are just that, a cake made in a large coffee mug!

To keep the protein high in these I use Kodiak Powercakes Mix, it has 14 grams of protein per serving and can be found at major grocery stores (including Costco, Target and Amazon).

You can use any pancake mix you want (including gluten free.  I have even made these with Enjoy Life’s pancake mix).  Just know different mixes will change the nutrition.

Now for that cake…

5 min Double Chocolate Mug Cake with Peanut Butter Frosting
  • Cooking spray
  • ½ cup Kodiak Cake Power Mix
  • 1 Tb Cocoa powder
  • 2 tsp coconut sugar (any sweetener of choice will work here)
  • 1/8 tsp salt
  • 1/8 tsp cinnamon
  • 1 tsp coconut oil
  • ¼ cup unsweetened cashew milk (can use any unsweetened milk)
  • ¼ tsp vanilla
  • 2 TB mini chocolate chips
  • 2 Tb PB2 (defatted dried peanut butter)
  • 1.5 Tb water


  1. Spray an extra-large microwave safe mug liberally with cooking spray.
  2. In mug, mix Kodiak Cake mix, Cocoa, sugar, salt and cinnamon.
  3. In a separate dish warm the cashew milk and coconut oil in the microwave (the oil should be melted but not boiling)
  4. Add the vanilla to the warm milk. Stir.
  5. Gently pour the liquids into the mug and stir gently. Mix till just combined (Do not over stir, or it will be tough.)
  6. Fold in chocolate chips
  7. Microwave at 75% power for 90 seconds. Let stand in the microwave for 1 min.
  8. While that nukes, mix the PB2 and water. Use as much water as you need to make a frosting like consistency.
  9. Gently side a knife around the edges of the cake and dump it on to a plate
  10. Frost with peanut butter frosting
  11. EAT CAKE!


Nutrition for the whole dang thing:

335 calories, 48 grams carbs, 9 grams fat, 20 grams protein

Low Carb High Protein Make Ahead Lasagna Jars

These little lasagna jars are not only healthy and tasty but also incredibly easy to prepare. They make a great meal prep option.  They can be stored for months in the freezer or kept in the fridge for 3 days.  I personally like to keep a few in my freezer as an option for those days where things do not go as planned and I need a quick meal. Just knowing they are in there keeps me from ordering take out or going to a drive through.

dsc_0023


Instead of noodles, this recipe uses zucchini.  I found slicing the zucchini thinly gave it the best texture. You can use a mandoline slicer or a shop knife.

Zucchini

While I used a jarred marinara (Amy’s brand) you could easily use homemade it you want.  Either way, make sure to pick a lower sodium and lower sugar option.

The most important aspect of this recipe is what you choose to store the lasagna in. If you plan to freeze these, make sure you use a freezable container. Also, it is helpful to use containers that are oven safe, that way they can go straight in the oven without dirtying another dish.   Wide mouth mason jars, Pyrex glass storage containers or Glasslock containers all work.  Just make sure you don’t put a frozen dish right in the hot oven, the abrupt temperature change can make the glass crack or shatter.

dsc_0096


Makes 6 pint sized mason jar servings.

  • 1 lb extra lean (99% lean) ground turkey
  • ½ onion, finely diced
  • 2 cloves, minced
  • 1 jar Marinara Pasta Sauce (look for a lower sodium and lower sugar variety, I like Amy’s brand)
  • 3 Tb egg white
  • 1 cup low fat cottage cheese
  • 1 medium zucchini
  • ¾ cup part skim shredded mozzarella
  • chopped fresh basil


  1. Using a mandoline, thinly slice the zucchini. You can slice by hand, but the thinner the better.
  2. Spritz large skillet with cooking oil and sauté onion till translucent.
  3. Add ground turkey and brown.
  4. Add minced garlic, and cook for 1 min.
  5. Pour in marina sauce
  6. Meanwhile in a small bowl, combine cottage cheese and egg white.

Assembling jars

  1. Line up 6 containers. And layer half the zucchini slices in the bottom of the jars.
  2. Next add cottage cheese mixture to each jar.
  3. Then add meat and sauce.
  4. Repeat with remaining cottage cheese and then sauce mixture.
  5. Top with half the zucchini slices.
  6. If you plan to cook them immediately, top with cheese, about 2 Tb per jar, and bake at 350 for 15 mins. Or until the mixture is bubbly and the cheese is melted.Otherwise store in the fridge for 3 days or in the freezer for 3 months.Top with cheese before cooking. (And I recommend defrosting before cooking if frozen.) You can bake for 20 minutes at 350. Or use the microwave (keep in mind the cheese won’t get all crispy and brown in microwave)
  7. Sprinkle with fresh basil and enjoy!

Nutrition for 1/6 the recipe:

Calories: 238 Fat: 8 grams Carbohydrates: 12 grams Protien:31 grams

low-carb-high-protein-2


Chicken, Bacon and Potato Soup

This is a perfectly warm and comforting soup, without all the carb and fat you usually get in a potato bacon soup. It’s is so light you probably will still be able to have some crusty bread with it (if you are into that sort of thing).   However, I felt the soup was plenty filling without the bread. The high protein content (35 grams per serving) helps keep you feeling full and satisfied while still being low in fat and carbs.

Chicken,bacon,potato_soup

Comforting chicken, potato and bacon soup.

Make sure to use bone in chicken thighs.  The bone helps keep the meat tender and not dried out.  If you can’t find any bone in thighs with the skin already removed, just remove it yourself.  Slip you finger between the skin and the meat, and tear off.  It can be slippery; I find grabbing the skin with a paper towel helps.  Using kitchen shears, cut off any remaining hunks of skin or fat.  Before serving, you will gently remove the thighs with a slotted spoon.  They will start to fall apart so you have to be gently.  Remove the bones and any cartilages and return to the slow cooker.

The whole recipe only takes 4 hours in the slow cooker on low.   Unfortunately, you do need to tend to it after 2 hours (to throw the potatoes in). But it is a great meal to make when you are going to be busy in the house doing other things.


Chicken, Bacon and Potato Soup

4  bacon slices, chopped

2 pounds bone-in chicken thighs, remove the skin.

½ tsp garlic powder

½ tsp onion powder

½ tsp oregano

½ kosher salt

2 large leeks, thinly sliced

4 carrots sliced

4 celery stalks, sliced

4 cups unsalted chicken stock

3/4 teaspoon kosher salt

1/2 teaspoon freshly ground black pepper

5 thyme sprigs

12 ounces baby potatoes

2 huge handfuls baby spinach


  1. Cook bacon in a large skillet, till nice and crispy.  Remove bacon and set aside.  Leave the bacon fat in the pan
  2. Season chicken thighs with seasonings (garlic powder, onion powder, oregano and salt) Place in skillet and brown.  Approximately 4 minutes per side. Remove and place in slow cooker.
  3. Add carrot, leek and celery to pan and sauté for 5 mins.  Then move to slow cooker.
  4. Add chicken stock and bacon to slow cooker.  Cover and cook on low for 2 hours.
  5. After 2 hours add potatoes and cook on low for another 2 hours.
  6. Remove chicken and pull meat from the bone.  Shred and put back in slow cooker.  Add spinach and salt and pepper to taste.


Enjoy!


Nutrition Info for 1/6 the recipe: 256 calories 7 grams fat, 15 grams carbs, 35 grams protein


Inspired by a recipe in Cooking Light Magazine.

Make Ahead Mason Jar Lunches

Healthy lunches are hard when you are busy or not at home during the day.  It’s just too easy to run to the café or a nearby restaurant to grab something quick. So this week I have been I I would experimenting with some healthy lunches that you can make ahead of time.

dsc_0347

Mason Jar Cobb Salad

Food prep in mason jars has been all the rage lately.  My breakfast overnight oats in mason jars is one of my most popular recipes.  So I thought I would test some of these mason jar salads out and see if they held up to the hype.  Overall I was fairly impressed.   You can make a bunch on one day, vary the ingredients so you don’t get bored and they keep for a couple days in the fridge.

They last about 3-5 days in the fridge (to be honest, I feel 5 days is kind of stretching it. I would stick closer to 3.) The trick in making them is how you layer them. The order of ingredients is very important to keep everything delicious and not soggy.

Below are the basic instructions to making your own jars. By following these basic instructions, you can easily come up with your own versions. These are incredibly customizable and just like the overnight oats you can easily adjust for your own tastes.  I have also included a couple recipes I tested out below, a Cobb salad and a basic salad with quinoa.  (I am also testing out a zucchini noodle and quinoa salad.  If it is a success look for that recipe in a few days!)

You need wide mouth quart size mason jars. The pint size it just too small. The regular mouth could work, but it is just easier and less messy with the wide mouth.

  1. Dressing goes on the bottom. This helps keep the more delicate or absorbable ingredients from getting soggy.  Generally, I use 1-2 tablespoons.  But if you are dressing fanatic you can add more. Can adjust to your personal taste preferences.
  2. Layer the ingredients. After the dressing add the heaviest NON ABSORBANT ingredients, like carrots or cucumbers. Next add in any grains, beans or pasta. Then add in any cheese or protein. Next add in any soft veggies or fruit, like cut strawberries or avocado (if you are making these more than 24 hrs. ahead of time I would wait and add these the day of.) On top of these place any nuts, seeds or light grains (like quinoa! I layered the quinoa above the dressing in my recipe below and it ended up soaking up most of the dressing, so make sure you layer it up higher.) Last but not least, add the salad greens. When adding your greens, gently push everything down.  You want it fairly compacted to keep the layers mixing.
  3. Add perishables the day off. Things like avocado or fruit (or maybe hard boiled eggs) need to be added the day of (or at most the day before) I found in my experiments that anything more than 24 hrs. the avocado started to brown and the fruit started to break down.
  4. When it is time to eat: shake, shake, shake, shake it off. (sorry couldn’t help myself there). But seriously you need to really shake it up good.  Then pour onto a large plate or bowl and enjoy.  Technically you could eat it straight from the jar, but every time I did that I ended up making a huge mess. That might be my problem though.


After constructing the salads, tightly cap and store in the fridge.  When transporting them, try to keep them as up right as possible.  That will keep the dressing from mixing with the other ingredients.


Mason Jar Cobb Salad

Makes 2 quart jars

  • 2 Tb your favorite Ranch (I used Bolthouse)
  • 2 strips bacon
  • 10 grape tomatoes
  • ¼ cup grated carrots
  • ¼ cup sliced cucumber
  • 2 ounces avocado, diced
  • 2 large hard-boiled eggs, diced
  • 4 ounces cooked or grilled chicken breast, diced
  • 1/2 ounce blue cheese
  • 4 cups chopped romaine lettuce

Layer everything in the mason jar in the order listed above.  Pack it tightly and secure lid.  Will last 24 hrs. as is, if making ahead of time add the avocado and egg in no more than 24 hrs. in advance.  When it’s time to eat, shake it up really well and pour on to large plate.

nutrition:

calories: 357 fat:18 carbs:18 Protein: 30


Quinoa salad Jar

  • 1 Tb Vinaigrette*
  • ½ cup cherry tomatoes
  • ¼ cup garbanzo beans
  • 1.5 oz. grilled chicken breast
  • ¼ cup cooked quinoa
  • 1 hard-boiled egg, chopped
  • 1 oz. avocado
  • 2 cups salad greens

Layer everything in the mason jar in the order listed above.  Pack it tightly and secure lid.  Will last 24 hrs. as is, if making ahead of time add the avocado and egg in no more than 24 hrs. in advance.  When it’s time to eat, shake it up really well and pour on to large plate.

(In the pictures, you’ll notice I layered the quinoa right above the dressing.  I don’t recommend doing this.  The quinoa absorbed a lot of the dressing and got soggy.  By layering it up higher, it will stay dry and fluffy) *I used a basic homemade vinaigrette.

Nutrition:

Calories: 380 Fat: 11 carbs:39 Protein: 32