Cinnamon Bun, 5 Minute, High Protein Mug Cake

Mug Cake Monday again!

Today we have a high protein, 5-minute cinnamon bun mug cake.

China-bun Mug Cake

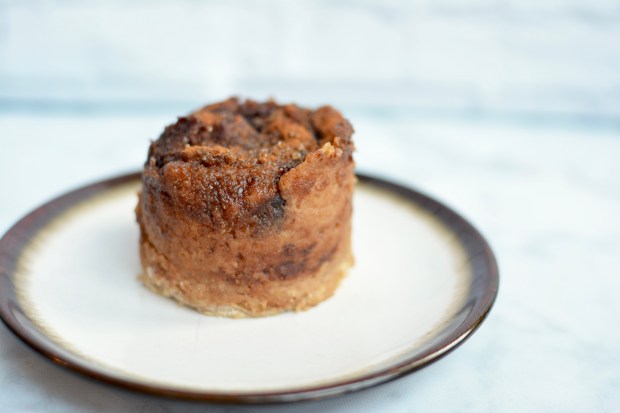
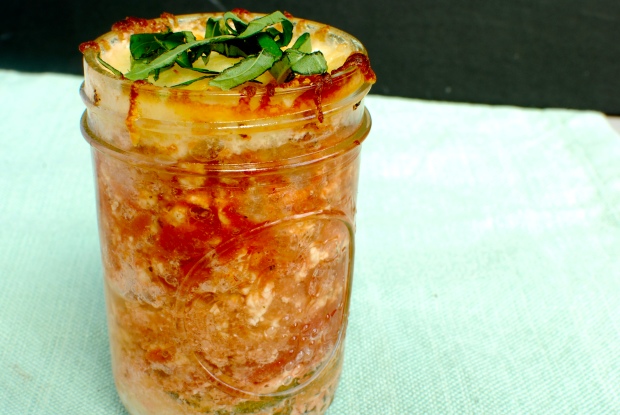
5 minute, high protein, cinnamon bun mug cake!

Just like last week’s mug cake, this baby can be made in the microwave in just over a minute and they are a great pre workout meal. (If you missed last weeks, we had a double chocolate peanut butter one you can go check out here.)

I am a big advocate for fueling your workout. Optimally, 1-2 hours before your workout you should have a meal that consists of carbs and protein.  In most cases 25-50 grams of carbs, 15-30 grams of protein and less then 10 grams of fat. This mug cake fits the bill.  Plus, it is freaking delicious.

This mug cake has 14 grams of protein, for those who need more pre workout, a scrambled egg white or a glass of skim milk is a perfect accompaniment.

By supplying your body with fuel before your workout, you are more likely to work out harder and in turn get a better workout, than if you were to do it fasted.  Multiple studies have shown there is no great benefit to fasted training. [1][2]

Again, I used Kodiak Cakes power cake mix since it is higher in protein.  You can use any pancakes mix that you want, just know it will alter the nutritional breakdown.  I have even made these with Enjoy Life’s allergy free pancake mix and they came out great.

5 min Cinnamon Bun Mug Cake

Cooking spray

½ cup Kodiak power cake mix

1 tsp coconut sugar (any sweetener of choice will work here)

½ tsp cinnamon

1/8 tsp salt

1 tsp melted coconut oil

¼ cup cashew milk (and dairy like beverage would work)

1/2 tsp vanilla extract

1 tsp coconut sugar

½ tsp cinnamon


  1. Generously spray the insides of a large microwave safe mug with cooking spray.
  2. Mix in pancake mix, 1 tsp sugar, ½ tsp cinnamon, and salt.
  3. In separate microwave safe cup mix milk, oil and vanilla. Heat in microwave till coconut is melted.
  4. Add the liquids with dry ingredients. Gently mix till just combined, making sure in mix in all the dry power off the bottom of the mug but do over stir!
  5. Top with additional cinnamon and sugar and cut in with a knife.
  6. Microwave at 75% power for 90 seconds.
  7. Let stand for 1 min, then enjoy!


Nutrition for one mug cake:  275 calories 41 carbs 8 fat and 14 protein


Works Cited

[1]Paoli A1, M. G. (2011). Exercising fasting or fed to enhance fat loss? Influence of food intake on respiratory ratio and excess postexercise oxygen consumption after a bout of endurance training. Int J Sport Nutr Exerc Metab, 48-54.

[2]Schoenfeld B., A. A. (2014). Body composition changes associated with fasted versus non-fasted aerobic exercise. J Int Soc Sports Nutr, 54.

5 Minute, High protein Cinnamon BunMug Cake


Low Carb High Protein Make Ahead Lasagna Jars

These little lasagna jars are not only healthy and tasty but also incredibly easy to prepare. They make a great meal prep option.  They can be stored for months in the freezer or kept in the fridge for 3 days.  I personally like to keep a few in my freezer as an option for those days where things do not go as planned and I need a quick meal. Just knowing they are in there keeps me from ordering take out or going to a drive through.

dsc_0023


Instead of noodles, this recipe uses zucchini.  I found slicing the zucchini thinly gave it the best texture. You can use a mandoline slicer or a shop knife.

Zucchini

While I used a jarred marinara (Amy’s brand) you could easily use homemade it you want.  Either way, make sure to pick a lower sodium and lower sugar option.

The most important aspect of this recipe is what you choose to store the lasagna in. If you plan to freeze these, make sure you use a freezable container. Also, it is helpful to use containers that are oven safe, that way they can go straight in the oven without dirtying another dish.   Wide mouth mason jars, Pyrex glass storage containers or Glasslock containers all work.  Just make sure you don’t put a frozen dish right in the hot oven, the abrupt temperature change can make the glass crack or shatter.

dsc_0096


Makes 6 pint sized mason jar servings.

  • 1 lb extra lean (99% lean) ground turkey
  • ½ onion, finely diced
  • 2 cloves, minced
  • 1 jar Marinara Pasta Sauce (look for a lower sodium and lower sugar variety, I like Amy’s brand)
  • 3 Tb egg white
  • 1 cup low fat cottage cheese
  • 1 medium zucchini
  • ¾ cup part skim shredded mozzarella
  • chopped fresh basil


  1. Using a mandoline, thinly slice the zucchini. You can slice by hand, but the thinner the better.
  2. Spritz large skillet with cooking oil and sauté onion till translucent.
  3. Add ground turkey and brown.
  4. Add minced garlic, and cook for 1 min.
  5. Pour in marina sauce
  6. Meanwhile in a small bowl, combine cottage cheese and egg white.

Assembling jars

  1. Line up 6 containers. And layer half the zucchini slices in the bottom of the jars.
  2. Next add cottage cheese mixture to each jar.
  3. Then add meat and sauce.
  4. Repeat with remaining cottage cheese and then sauce mixture.
  5. Top with half the zucchini slices.
  6. If you plan to cook them immediately, top with cheese, about 2 Tb per jar, and bake at 350 for 15 mins. Or until the mixture is bubbly and the cheese is melted.Otherwise store in the fridge for 3 days or in the freezer for 3 months.Top with cheese before cooking. (And I recommend defrosting before cooking if frozen.) You can bake for 20 minutes at 350. Or use the microwave (keep in mind the cheese won’t get all crispy and brown in microwave)
  7. Sprinkle with fresh basil and enjoy!

Nutrition for 1/6 the recipe:

Calories: 238 Fat: 8 grams Carbohydrates: 12 grams Protien:31 grams

low-carb-high-protein-2


Quick and Easy Chicken Tortilla Soup

I don’t know about where you are, but it is FINALLY cold here in North Texas. Like cold enough it is snowing!  Ok they are just flurries. (I will always be a Midwesterner at heart).  Cold weather means soup time. This Chicken Tortilla soup one of my all-time favorite soup recipes.  Mainly for the fact it only takes 20 minutes while still being healthy and satisfying.

img_1822

There are two time saving short cuts in this recipe. The first is, instead of baking up chicken to use, just grab a rotisserie from your local grocery store.  I liked to drain off all the extra fat when I get home and remove the skin.  If it’s cool enough, I remove all the meat.  For this recipe all you need is the breast meat (skin removed) so save the extra meat from the thigh, legs and wings for adding into salads.

The second time saver is using the blender instead of having it simmer all day long. Throwing it in the blender or using an immersion blender will give a a great texture without having to cook it for a long period of time.  Please note, if using a blender do not place the clear plastic filler cup on the lid.  Leave the middle hole open.  When you blend it, place a tea towel over the hole to let the steam escape.

Instead of using tortilla chips for the topping,  we are baking our own using fresh tortillas. Don’t worry it only takes 10 minutes and they are lower in fat and tastier too! I am big fan of baking up my own tortilla chips, that way I don’t have a big open bag laying around tempting me.  I just bake as many as needed.

dsc_0689

Quick and Easy Chicken Tortilla Soup

  • 2 Carrots, chopped
  • 1 Green Bell Pepper, chopped
  • 1 onion chopped
  • 1 Tb olive oil
  • 1 15 oz can diced tomatoes, NOT drained
  • 4 cups chicken broth
  • ¼ cup Corn Meal
  • 3/4 tsp Salt
  • 1/2 tsp, chili powder.
  • 1 tsp, Ground Cumin
  • ½ tsp oregano
  • ½ tsp paprika
  • ½ garlic powder
  • 1 avocado
  • green onions
  • cilantro
  • 8 tortillas, Tortillas
  • Chicken breast from rotisserie chicken, skin removed. (approx. 12 oz)
  • 1/2 cup frozen corn


  1. Preheat oven to 350. Cut corn tortillas into ½ inch strips.  Light spritz with cooking spray and salt. Cook for 10 minutes till crispy but not burnt.
  2. In a large pot heat oil. Cook onion, green bell and carrots till starting to soften.  About 8 minutes.
  3. Dump in diced tomatoes and chicken broth. Bring to a bowl.
  4. Add in the corn meal and approx. ¼ of the crunchy corn tortillas.
  5. Add in salt, chili powder, cumin, oregano and garlic powder.
  6. Carefully pour entire soup pot into a blender or use an immersion blender. Blend till smooth. **If using a blender, when placing the top in the blender do not insert the plastic fill cup. Leave the hole open in the lid and hold a tea towel over the lid.  This is very important; it allows the steam to escape. Otherwise it will blow up on you and you will have a steamy hot mess! **
  7. Shred chicken breasts.
  8. Return to soup pot and add in chicken and frozen corn. Reheat till warm. And top individual bowls with diced avocado, crunchy tortilla strips, green onion and cilantro.
  9. Enjoy!


Makes approximately 6 servings.  Each serving is about 1 ½ cups and has:  278 calories, 9 grams of fat, 29 grams of carbohydrates and 22 grams protein.

chicken-tortilla-soup

Stress free Beef Gyro Bowl

This is another quick and easy recipe when you don’t feel like cooking.  I like to keep this one on my menu during chaotic weeks when I don’t want to stress myself out any more. Like, I don’t know, the holiday season? It is basically just seasoned ground beef, topped with veggies and some tzatziki. Not only is this recipe stress free it is also high in protein and relatively low in carbs!

Tzatziki

Tzatziki made with greek yogurt

If you are not familiar with tzatziki, it’s a cold sauce or dip made from yogurt. The recipe will make more tzatziki then you need for these gryo bowls. Save it, don’t toss it! There are so many ways to eat it.  As a dip for crackers or veggies.  Or it goes great with just about any meat.

These gyro bowls are able to be customized to meet your needs.  Need some carbs? Serve over rice.  Need more protein? Serve over quinoa.  Neither?  Serve over cauliflower rice or spinach.  I personally prefer a mixture of quinoa and spinach.

The tzatziki does take some time since it needs to be prepared ahead of time. Everything else,however, comes together in 20 minutes! You can make the tzatziki ahead of time. (I’ve kept mine if the fridge for a couple days.  I have no idea if will last longer than that since I usually eat it all my then!)

Beef gyro bowl

Beef Gyro Bowl over quinoa and spinach.

Top these bowls with whatever veggies you are feeling like.  I  use whatever I have hiding out in my fridge.  I imagine some beets and radishes would go pretty well on this!  If making this for little ones (or picky adults), just exclude things their palates might not like (in my house I leave the olives and red onions off the kids bowls)


Tzatziki

Makes 4 huge servings or more, smaller ones if you are not as obsessed as me.


16 oz 2% or whole fat plain greek yogurt. (Don’t use nonfat it will be too runny)

1 large cucumber, peeled seeded and diced

1 tb lemon juice

1 tb red wine vinegar

1 tb olive oil

4 cloves garlic minced or pressed

1 tsp dried dill


  1. Seed the cucumber by cutting it in half and using a spoon to scrap the seeds out of the middle. Dice it as small as you have the patience for.
  2. Toss the cucumber with kosher salt and place in a strainer. Fill a large gallon sized bag fil with ice and place on top and let it sit for at least an hour.
  3. In the meantime, mix all remaining ingredients.
  4. Remove cucumber and using cheese cloth or thick paper towel squeeze out any excess liquid.
  5. Mix with yogurt mixture and adjust salt and pepper to taste
  6. Set in fridge for at least on hour.


Gyro Bowls

Makes 4 servings


1 lb 95% lean ground beef

1 tsp dried oregano

1 tsp dried rosemary

1 tsp kosher salt

½ tsp garlic granules (or minced fresh garlic if you wish)

2 cups spinach

½ cup quinoa (omit if using rice or cauliflower rice)

1 cucumber, peeled and sliced

½ cup red bell pepper, sliced

1 cup cherry tomatoes, halved

¼ cup red onion, diced

¼  cup Kalamata olives

¼ cup chopped walnuts.


1.Cook quinoa (or rice) according to package.

2.Season beef with oregano, rosemary and salt and pepper. Brown over medium heat and drain off any fat.

3.Place ¼ cup quinoa in each bowl.  Top with ¼ of the ground beef.  Add spinach, cucumber, red bell, tomatoes, red onion.  Top each bowl with ½ cup tzatziki (less if you are not a freak about it like I am), 1 tb Kalamata olives and 1 tb walnuts.


Enjoy!


Nutrition for ¼ the amount plus ½ cup tzatziki

Calories: 379 Carbs: 24 Fat: 14 Protein: 38


Inspired by a recipe from Clean Eating Magazine.

quick-and-easy-beef-gyro-bowls


30 Minute Spaghetti Squash with Shrimp

I am not anti carbs or anti pasta by any means, but sometimes you need a nice satisfying lower carb meal option.  Especially this time of year when there is an overabundance of carb rich food everywhere you look.  That is where spaghetti squash comes in. In can be a great replacement for traditional noodles.

dsc_0577

Let’s keep something straight though, spaghetti squash does not taste exactly like noodles.  It has a little (non offensive) vegetal taste and it has a little more crunch to it then traditional noodles. Don’t get me wrong it is still delicious. I just don’t want anyone to make it and expect it to taste like regular wheat noodles and be disappointed.

One cup of spaghetti squash has only 42 calories and 10 grams of carbohydrates compared to once cup of traditional cooked noodles that have 221 calories and 43 grams of carbohydrates.  Making spaghetti squash a great substitute when you are trying to lower the overall calorie or carb amount of your meal (or you would rather get all those calories/carbs from somewhere else).

When it comes to cooking the squash there are many different ways you can do it. You can roast it in the oven, put it in the slow cooker or microwave it.  Microwaving is my personal favorite. It is quick and it makes cutting it easy.  No more failing around the kitchen with it stuck to end of your knife while you slam it on the counter.  (Please tell me I’m not the only one who has done that?!)

When you microwave it, make sure you stab it all over with a fork.  That will release the steam and prevent it from becoming a bomb in your microwave.  For a 2 ½ pound squash, it will need to cook for about 14 minutes. Turning over halfway through.  If your squash is larger it will need more time.  It is done when the outer skin is soft and easily pierced. After that, DO NOT take it out of the microwave.  Leave it in there, for another 10 minutes.  It will continue to steam on the inside.  (This is a great time to prep the rest of your meal.)

Spaghetti Squash

Cutting the squash in half width wise leads to longer noodles.

Once the 10 minutes is up, carefully remove the squash, it will still be hot.  Cut it in half width wise, not length wise like you have always been told!  When you cut it width wise you get nice long noodles, not the 2 inch ones. Gently scrape out the seeds and any loose pulp.  Since it is already cooked, you will not have to put too much man power into this.  Using a fork, gently pull the flesh out into a bowl and separate into strands.

If you don’t want to microwave it, you can cook it in the oven. Cut the squash in half, scoop out the seeds and place in a pan cut side down.  Place a small amount of water around the squash and bake at 400 for 35-45 mins.  Alternatively, you can cook it in your slow cooker too.  I have, however, yet to try this method. You need to pierce it all over with a fork and place whole in your slow cooker on low for 6-8 hrs.  It’s is done when it can be easily pierced with a knife.

Just about anything you can do with regular noodles you can do with spaghetti squash.  However, I prefer something lighter, like garlic, olive oil with shrimp.  In this recipe I used precook frozen shrimp because that it what I had on hand. You also could sub out precooked chicken breast. spaghetti-squash


Garlic Lemon Shrimp on top of Spaghetti Squash with Garlic and Olive Oil.

For the squash:

2 ½ pound spaghetti squash

2 Tb Olive oil

2 cloves Garlic, minced

¼ cup shredded parmesan

1 tsp red pepper flakes

1 tsp kosher salt

For the Shrimp:

4 cloves garlic, minced

1 Tb Olive oil

1.4 cup fresh lemon juice

½ tsp kosher salt

¼ tsp black pepper

1 ¼ precooked, defrosted peeled and deveined shrimp.


  • Prick the squash all over with a fork. And microwave for 6 minutes. Turnover and microwave for another 8 minutes. Let continue to steam in microwave for another 10 minutes.
  • While squash is cooking make the shrimp. Place garlic and oil in a large skillet and cook over medium heat for 1 minute.  Add lemon juice, salt and pepper.  Toss with Shrimp (or precooked chicken) and set aside.
  • When squash is done steaming, remove from microwave. Cut in half width wise and remove seeds. Using a fork pull out the flesh and separate into strands.
  • In the same skillet used to cook the shrimp heat the olive oil. Add garlic and cook for 1 minute.  Careful not to burn the garlic.
  • Add red pepper flakes (If make this for kids, you may want to omit this step. And top individually with red pepper) cook for 1 more minute.
  • Add cooked squash and toss. Season with salt and parmesan.
  • Toss in prepared shrimp. And serve.


Nutritional info for 5 shrimp and 1/4 the spaghetti squash

Calories: 297 Fat:13 Carbs:20 Pro:24

Adapted from Spaghetti Squash in Gina Homolka’s Skinnytaste Fast and Slow Cookbook.